Garden Edging DIY
Discover versatility with FormBoss, offering 8 distinct profile heights to suit a range of applications. From sleek defining profiles to robust retaining walls, stylish planter beds, or functional steps, there’s a perfect fit for your project.
For optimal strength and a seamless appearance, make sure to bury at least 30mm of the edging below the soil level. This simple step not only hides screws and connector folds but also ensures but also seamless and well-integrated connection.
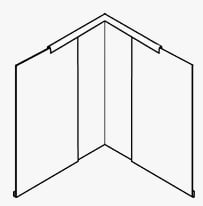
Easy to connect system and create corners.
Simplify your garden edging installation with this user-friendly do-it-yourself method. The flexibility to fold allows effortless shaping around corners and curves, accommodating profile heights of 100mm, 150mm, and 185mm.


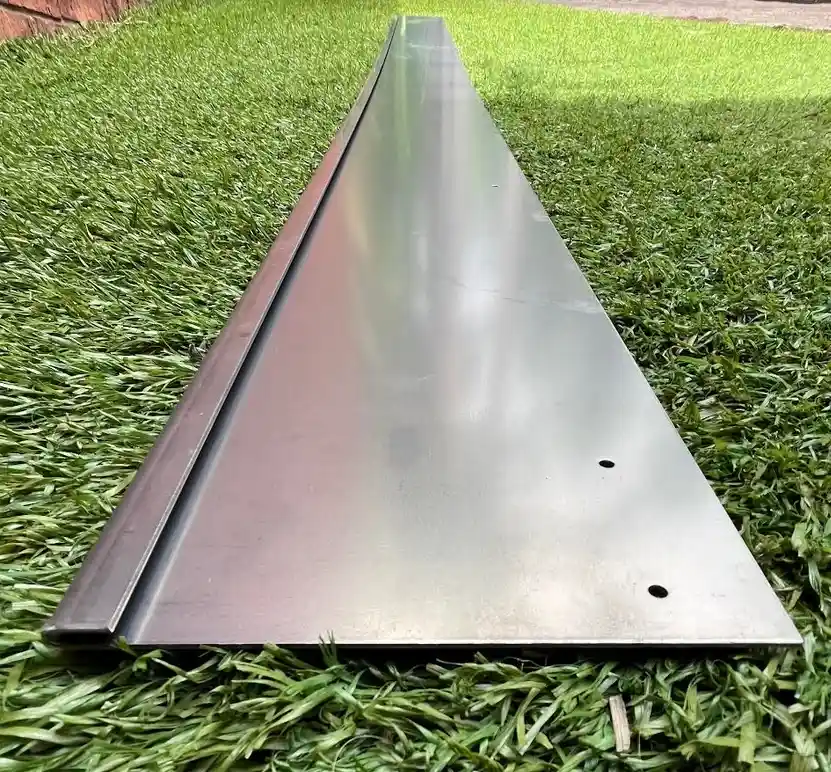
Curving Profiles Over 230mm High:
You can actually shape the larger edging profiles more aggressively than the lower heights without kinking the top lip. This is because the length of edging has significantly more steel, giving it a more rigid backbone. It can help to have a friend help shape the edging, especially with the last 20cm or so. It is quite hard to get a tight curve into the last little bit as there isn’t any leverage. You can always shape your edges, cut off the last little bit, and use it as a connector if you find you can’t get enough shape into the last 20cm.
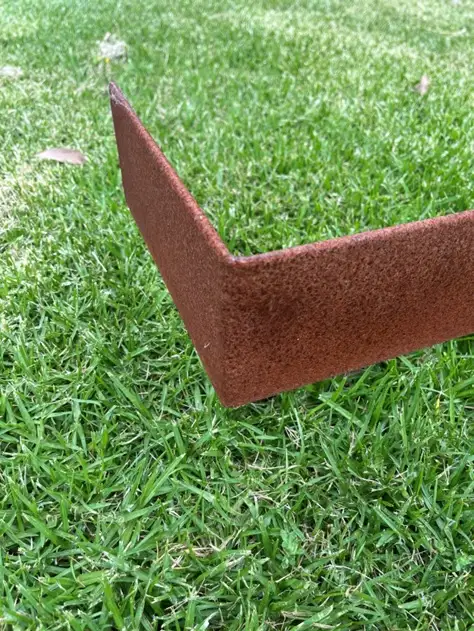
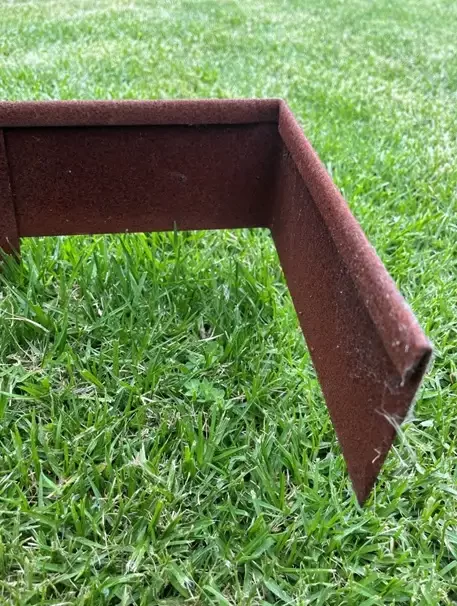
Producing Corners & Angles:
It can be quite difficult to produce angles on site with larger profiles (230-580mm), as they are significantly stronger. We highly recommend that you purchase a pre-made corner piece to keep the installation as simple as possible.
For taller planter boxes we recommend getting us to pre-fabricate them from straight lengths, as there will be less joins, making them more secure.
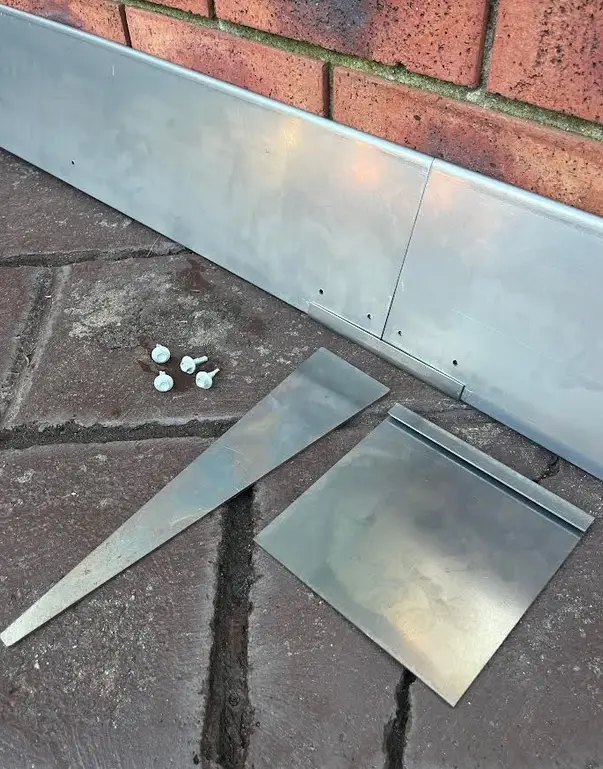
Connecting:
Connect your retaining edges in the same way you usually would, although you’ll need to insert two screws on either side of the connector as opposed to the usual one. Clamping the edging whilst putting your screws in becomes a bit more important to ensure it doesn’t move whilst screwing.
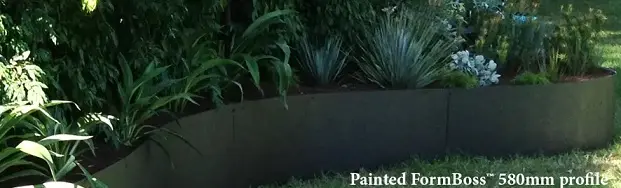
The 580mm high edging can bow in the belly slightly since the profile is so high and because of the flexibility of the steel. Instead of inserting extra screws which can look unappealing, try popping in a couple of pop rivets halfway up your profile for a nice clean finish.
Watch the installation video to see just how easy it is to install FormBoss®
Installation PDF

Installing Rings
Installing Retaining Edges
There are a few differences when installing FormBoss® steel garden edging profiles over 290mm high. It may take a bit more work than our general edging systems but looks fantastic once installed.
Retaining Edging Profiles: 290mm, 390mm, 580mm.
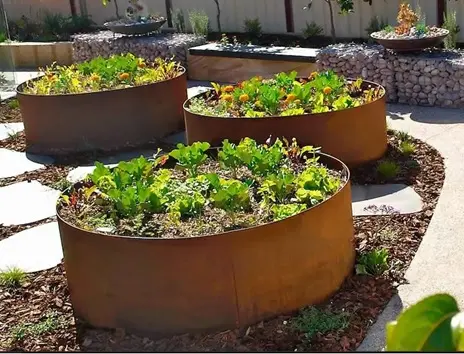
Uses:
Raised planter beds in any shape you desire, or straight.
Steps
Root barriers for stopping invasive grasses
Retaining walls
Designer gardens
many more…
Preserving Your Retaining Edges
Making sure that your retaining edges last as long as possible is crucially important to your installation, especially when working with raised garden beds and planter beds. Because you’re constantly watering your plants, the steel will be constantly wet on the inside of your line. There are multiple methods of improving the preservation of your project, see below for some ideas:
Drainage
Water Penetrabillity
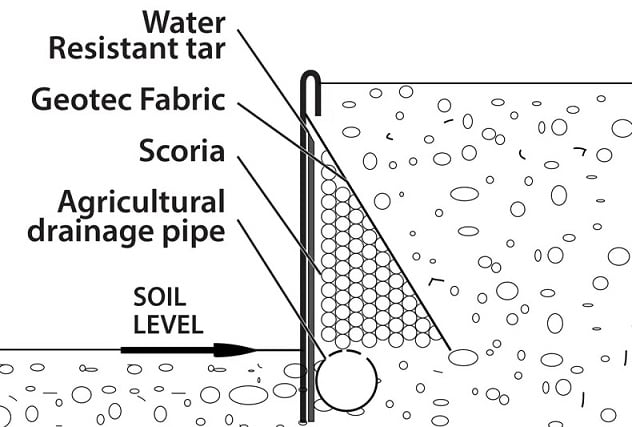
Consult An Expert
Take a look at the diagram below to get an idea of some simple drainage options:
Warranty
IMPORTANT: If you are not taking any steps at all to improve the preservation of your edging profile (over 290mm high), then you are not covered by our 10 year structural warranty.
Creating Steps With REDCOR
Steps can easily be created using FormBoss metal edging profiles to form a strong and durable front face to a step. They are very popular in our Redcor steel version, because of the natural organic weathered look. It also offers a natural anti-slip feature as the edge is textured. The galvanised steel can blend in very well since grey is a neutral colour, and can look fantastic in modern buildings.
Using FormBoss for steps gives you total freedom of design, you can have them straight, curved, with angles or why not create something completely unique? We offer a wide range of profiles to suit almost any step height and utilize the wide range of our angled stakes to make sure they remain strong and secure after many years of use.
The installation process is basically the same as a standard installation, with a few exceptions. Please refer back to the video and standard installation instructions for the basics:
Angled stakes are required rather than the standard tapered staked. You get a lot of strength out of our angled stakes which will allow you to have quite a bit of foot traffic using the steps without any strength problems.
We Recommend...
Displaying how angled stakes reinforce your step, before back filling over the screws.

Using angled stakes of at least twice the length of the edging profile height used for optimum anchorage.
Generally, the spacing of the stakes is marginally closer than standard edging applications, we generally recommend 4 per length, or 600mm centres as opposed to the standard 3 per length or 800mm spacing. For heavy traffic areas use 400mm spacing for extra strength.
Burying around 40% of your edging as opposed to the standard 30%, this will give the edge a better back bone and keep it strong for years to come.
For further strength and longevity, we recommend concrete haunching, or concreting the base of the stakes at least. If creating public steps or retaining walls, concrete haunching can be very important for edging to sustain its durability.
Having clean creative steps can really do a lot for your design. Make sure to find a nice crushed rock to finish your steps with, crushed rock will drain really well, and comes in many different colours. This is steps like never before, FormBoss™ allows you to have complete control over your design!
More Questions about Installation
All our lengths are 2.44m.
Redcor steel will arrive a slightly silver, light grey colour. In some cases, it can look very silver making it seem like it is Galvanised or ZAM. To help distinguish between the three see the descriptions below.
– Galvanised – Silver, distinct speckled design all over the edging
– ZAM – bright, silver, smooth finish, no speckles, similar finish to stainless Steel
– REDCOR Steel – Slightly silver appearance, light grey in colour, dark oily residue.
Due to the way we store our lengths (see more information below) we would not be able to pull them apart as they would fuse together.
It could take from couple of weeks to a couple of months, depending on the elements. If there is a lot of rain, it will rust quicker. If there is more sun it will take longer. If you run a hose over it every couple of days that will quicken the process. If you do want to rust it faster we recommend a vinegar and water mix as the most naturally effective solution. This will help to break down the residual oil coating and begin the rusting process.
Tips for driving self tapping screws into steel:
• Clamp the pieces together securely.
• Use impact driver or cordless driver with 8mm Hex
head bit
• Apply firm pressure initially, with a slow rpm, to get
the screw to bite
• Never exceed 3000rpm
• Pause every few seconds to avoid overheating the
screw tip
• Use a little lubrication on the tip of the screw to
avoid overheating (you can use cooking oil)
• Any excess heat will make the tip of the screw blunt
• Excess heat will also work-harden the garden edging
• If above steps do not work, try pre-drilling with
good quality 3mm drill bit
With the FormBoss® system, you are drilling through
4 to 5mm thick steel, so please be patient and use
the techniques described above.
We supply quality Australian made screws, and are
the best performing screws available, but you still
need to follow the advice above to achieve the best
result. You may still find a few screws are not up to
the task, simply restart a new hole with a fresh screw.
We always supply you with a few extra.
FormBoss® is stored with the bottom of a piece of edging slipped inside a second piece of edging, forming what looks (when wrapped up) only 1 length. Your connectors will be delivered the same way.
Included in the price of a length is 1 connector and enough screws to install, see below for correct screw quantity per item.
– 75mm – 150mm: 2 screws per length, 1 each side of connector to join the length to the connector.
– 185mm – 580mm: 4 screws per length, 2 each side of connector to join the length to the connector. For added strength add rivets about half way up the edging/connector, silver or copper depending on the finish.
– Tapered Stakes: 1 screw per stake.
– Angled stakes: 2 screws per stake.
– Corner Pieces: 1 connector and 2 screws included with the corner pieces.
We do not supply joins for corners as this creates weak spots in the edging, for the lower profiles (75 – 185mm) we suggest bending the edging to create smooth corners that continue the edging around bends maintaining the strength in the edging. For taller profiles (230-580mm) we recommend purchasing corner pieces. For taller planter boxes we recommend getting FormBoss® to pre-fabricate them from straight lengths, as there will be less joins, making them more secure.
Profiles Normal/ Sandy Soil Clay Soil
75mm 240mm tapered stakes 240mm tapered stakes
100mm 300mm tapered stakes 240mm tapered stakes
150mm 400mm tapered stakes 300mm tapered stakes
185mm 400mm tapered stakes 300-400mm tapered stakes
Profiles Normal/Sandy Soil Clay Soil
230mm 400mm angled stakes 400mm angled stakes
290mm 600mm angled stakes 600mm angled stakes
390mm 800mm angled stakes 600mm angled stakes
580mm 1200mm angled stakes 800mm angled stakes
Rolling into perfect rings can be difficult, which is why we offer a rolling service by our supplier. Any rings 3106mm diameter (4 lengths) or over can be done on site. If you are creating sweeping curves you will be able to shape down to roughly a 1000mm radius by hand. Using the Rubber Forming Strip will make this easier as it will help stop the edging kinking while shaping it and allow for it to be shaped down closer to an 800mm radius. It slides up under the rolled top to give the edging that extra little bit of strength to help curve, once the edge is the shape you require just take it out and repeat on the next length.
Because the edging isn’t really thick, it is not able to stand freely without some of it being in the ground. This is to ensure stability.
FormBoss’s strength comes from a combination of the rolled top lip which is manufactured locally, the staking system and the requirement that it is installed 1/3 into the ground according to our instillation guidelines. Because of these 3 key points, the FormBoss system is not required to be thick, therefor making it extremely user friendly and easy to manipulate onsite when creating shapes.
ZAM has a satin like finish, whereas the galvanized has more of a speckled finish.
ZAM comes with a 15year guarantee, which is 5 more than Gal.
Please allow up to 10 business days for all special production, including rings, boxes and custom shapes. We do stock some of our standard sized rings (777mm, 1165mm, 1554mm Ø), please call us to see if the ring you require is on our shelves.
NOTE: 777mmØ rings will arrive closed unless specified, all rings under 1000mmØ can be delivered closed if requested. All rings above this will arrive in sections as they are too large to ship or carry fully formed.
This will depend on the quantity of the order and the delivery location. Usually within 5-7 days if within Melbourne or the Mornington Peninsula.